
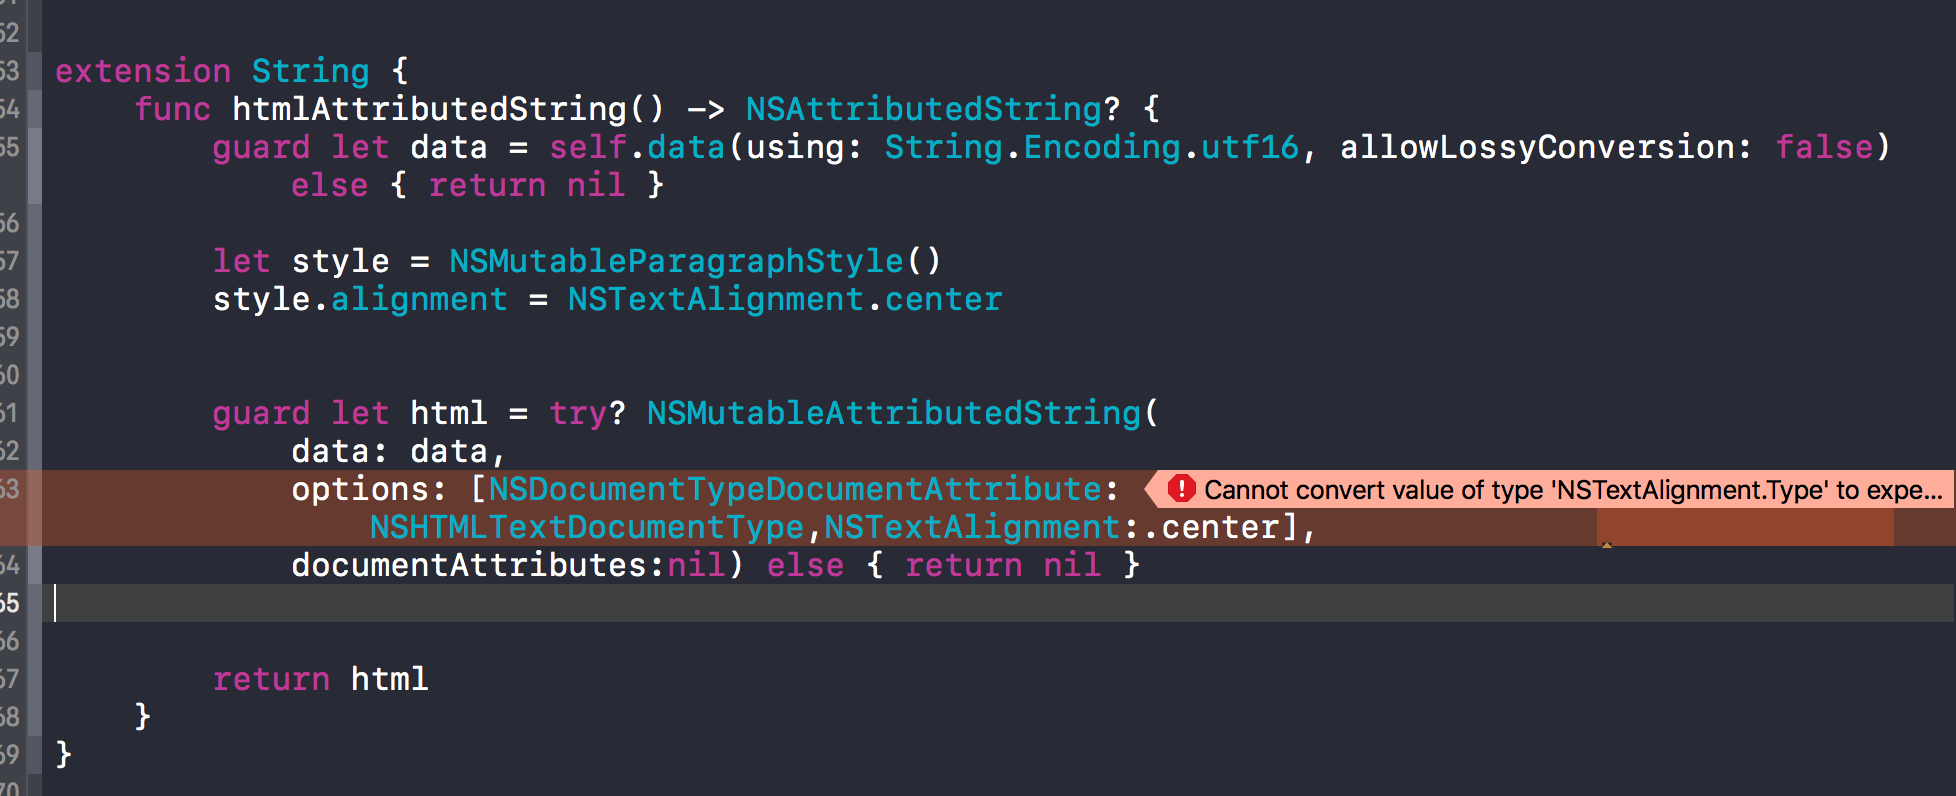
Swift has a feature called attributes, and in this blog post I am going to share a little trick with you, how to create an attributed string, in which you can do amazing things like this. We all know about the wealth of new features Swift was able to offer in the last few years, but I want to share with you a tiny trick that I recently discovered in Swift 3 that is absolutely mind-blowing.
One of the most beautiful parts of Apple’s Swift language is its simplicity. Its lack of features and type safety means its easier to work with strings. That is great but its also a problem. If the string you have to work with is a lot complicated and you cant tell where its coming from, what you are doing with it and why you are doing it, you are going to have a hard time figuring it out.
BonMot

BonMot (pronounced BonMo, which is French for good word) is a string library allocated by Swift. It strips away the complexity of iOS, macOS, tvOS and watchOS typography tools so you can focus on creating beautiful text. To run the example project, run the BonMot pod attempt or clone the repository, open BonMot.xcodeproj and run the Example-iOS target. In any Swift file where you want to use BonMot, just import BonMot.
Fundamentals
Use StringStyle to specify the style of the string to be assigned. Then use the stylized(with ? method for String to get the assigned string: Late quote = I liked to correct people’s grammar until I realized that I prefer friends. -Marah Wilson let style = StringStyle( .font(UIFont(name : AmericanTypewriter, size : 17) !), .lineHeightMultiple(1.8) ) let attributedString = quote.styled(with : style) // You can also get a dictionary of style attributes // if you are using an API that requires it. let attributes = style.attributes
Glossary
These are the types you’ll encounter most often when using BonMot to create assigned strings.
- StringStyle: A collection of attributes that can be used to style a string. This includes basic settings like font and color, but also advanced settings like paragraph checks and OpenType features. To get an idea of all the features supported by BonMot, take a look at the framework’s interface.
- StringStyle.Part : An enumeration that can be used to construct a short StringStyle. In general, you will interact with them instead of creating attribute by attribute StringStyles.
- Composable: a protocol that defines any type that can be added to an assigned string. BonMot provides functions, as in this example, to combine multiple composable values.
- NamedStyles : Use it to register custom and reusable styles in the global namespace.
- Special: a utility to insert special, ambiguous and non-printable characters into strings without making the code unreadable.
style inheritance
Styles can inherit from each other, so you can create multiple styles with common attributes: let baseStyle = StringStyle( .lineHeightMultiple(1.2), .font(UIFont.systemFont(ofSize : 17)) ) let redStyle = baseStyle.byAdding(.color(.red)) let blueStyle = baseStyle.byAdding(.color(.blue)) let redBirdString = bird.styled(with : redStyle) let blueBirdString = bird.styled(with : blueStyle)
Designing line segments with XML

Are you trying to design only part of a string, or even a localized string that varies depending on the language of the application? No problem. BonMot can convert custom XML tags and raw HTML into assigned strings: // Generally, this is a localized string let string = one fish, two fish, red fish, blue fish Let redStyle = StringStyle(.color(.red)) Let blueStyle = StringStyle(.color(.blue)) let fishStyle = StringStyle( .font(UIFont.systemFont(ofSize : 17)), .lineHeightMultiple(1.8), .color(.darkGray), .xmlRules([ .style(red, redStyle), .style(blue, blueStyle), ]) ) let attributedString = string.styled(with : fishStyle) Allows you to: Note the use of or to indicate a special character in a string. This is a great way to add special characters to localized strings, because localizers don’t always know how to look for special characters, and many of them are not visible or ambiguous in a normal text editor. You can use any character from the list of special characters, or you can use or
XML parsing with error handling
If the above method encounters an invalid XML, the resulting string is the full source string, including all tags. When parsing XML that you have no control over, such as variable server content, you can use this alternative parsing mechanism that allows you to handle errors that occur during parsing: Allow rules : XMLStyleRule] = [ .style(strong, strongStyle), .style(em, emStyle), ]. let xml = // an XML from the server do { let attrString = try NSAttributedString.composed(ofXML : xml, rules : rules) } catch { // Handles errors that occur with the Foundation XMLParser, // which BonMot uses to parse the XML }
Attachments
BonMot uses NSTextAttachment to enclose images in strings. You can use BonMot’s NSAttributedString.composed(or:) API to combine images and text into a single string: let someImage = … // someImage UIImage or NSImage let attributedString = NSAttributedString.composed(of : [ someImage.styled(with : .baselineOffset(-4)), // vertical shift if needed Special.noBreakSpace, // unbroken space between image and text label with icon, // raw or attributed string ]) Note the use of the Special type, which allows easy access to Unicode characters commonly used in user interfaces, such as spaces, dashes, and non-printable characters. Outings : If you need to insert multiple lines of text after an image, use Tab.headIndent(…) to align the entire paragraph after the image: let attributedString = NSAttributedString.composed(of: [ someImage.styled(with: .baselineOffset(-4.0)), // vertical offset if necessary Tab.headIndent(10), // horizontal spacing between image and text This is text that spans multiple lines and ends flat on the left, ]) Outings :
Dynamic type
You can easily make any assigned string generated by BonMot comply with the system’s text size control. Just add .adapt to each style declaration and specify whether the style should be scaled as .control or .body text. let style = StringStyle( .adapt(.control) // other parts of the style can be here if needed ) someLabel.attributedText = Label.styled(with : style).adapted(to : traitCollection) If you want the assigned string to adapt to the current size category of the content, use .adapted(to: traitCollection) when attaching it to the UI element, as in the example above.
Response to changes in content category
If you call UIApplication.shared.enableAdaptiveContentSizeMonitor() anywhere in your application’s configuration code, BonMot updates the shared UI elements when the preferred content size category changes. You can set your custom controls to update automatically by associating them with the AdaptableTextContainer protocol. If you want more manual control over the customization process and are iOS 10+ oriented, don’t enable the adaptive content size monitor and call .adapted(to: traitCollection) within traitCollectionDidChange(_:). With iOS 10, the preferredContentSizeCategory property was introduced for UITraitCollection.
Scaling behaviour
The behavior of .control and .body is identical, except that .body grows infinitely when the extended accessibility option of the dynamic type is enabled. Here is a diagram of the default behavior of Dynamic Type system styles:
XIB storyboard and integration
You can save globally named styles and use them in storyboards and XIBs through IBInspectable : let style = StringStyle( .font(UIFont(name : Avenir-Roman, size : 24) !), .color(.red), .underline(.styleSingle, .red) ) NamedStyles.shared.registerStyle(forName : MyHeadline, style : style) You can then use MyHeadline in the Interface Builder’s Attribute Inspector for commonly used UIKit controls, such as buttons and shortcuts: These styles with the same name are adopted when used as tag names in the parsed XML.
Assistants for debugging and testing
Use bonMotDebugString and bonMotDebugAttributedString to produce a version of an attributed string with all special characters and images added, expanded into a human readable XML: NSAttributedString.composed(of : [ Image, Special.noBreakSpace, Monday, Special.enDash, Friday ]).bonMotDebugString // Result: // Monday-Friday You can use XML rules to parse the received string (without images) and convert it into an assigned string. You can also record the output of bonMotDebugString and use it to check the assigned strings in unit tests.
Vertical alignment of text
UIKit allows you to align labels above, below or on the baseline. BonMot contains the TextAlignmentConstraint, a subclass of the Layout constraint that allows you to align labels to the height and x-height of the header. With some fonts, this is necessary to convey the designer’s intent: TextAlignmentConstraint works with all views that open the font property. It uses core value observation to monitor changes in policy attributes and adjust its internal metrics accordingly. It is ideal for use with the dynamic type: When the user changes the font size in the application, the TextAlignmentConstraint is updated. You can also use it to align the label with the normal view, as in the example above with the red dotted lines. Warning: TextAlignmentConstraint contains strong references to its properties firstItem and secondItem.
Make sure that the view constrained by this constraint does not also contain a strong reference to this constraint, as this will cause a memory loop. You can use TextAlignmentConstraint programmatically or in the interface designer. Use it in the code as follows: TextAlignmentConstraint.with( item : someLabel, attribute : .capHeight, relatedBy : .equal, toItem : someOtherLabel, attribute : .capHeight).isActive = true In the Interface Builder, start by linking two views together with the top link. Select the constraint and change the class in the identity inspector to TextAlignmentConstraint : Then go to the attribute inspector. TextAlignmentConstraint extends two text fields through IBInspectables. Enter the attributes you want to align. If you enter an invalid value, you will get a runtime error. The layout will not change in Interface Builder (IBDesignable is not supported for constraint subclasses), but it will work when you run your code. Message: Some of the possible alignment values are not supported in all configurations. Stay tuned for updates in issue 37. BonMot is written in Swift, but you have a number of options if you want to use it in an Objective-C code base:
- For older Objective-C code bases, consider using BonMot 3.2, the last major version written in Objective-C. Be sure to read the ReadMe for this version, as the syntax differs between BonMot 4.0 and later versions.
- If you mix Objective-C and Swift, you can create named styles, like in the Interface Builder section, and then refer to those styles in Objective-C :
UILabel *label = [[UILabel alloc] init]; label.bonMotStyleName = @MyHeadline ; BonMot 4 is a major upgrade, but there are some general templates you can use to make the transition easier. Note that this mainly concerns Swift projects that used BonMot 3. BonMot 4+ has limited Objective-C support. So if you need to maintain Objective-C compatibility, read this section before upgrading.
Separation of style and content

BonMot 4 introduces a StringStyle structure that contains style information. When you apply a StringStyle to an ordinary string, the result is an NSAttributedString. This is different from BonMot 3, where BONChain or BONText contained both style and string information. The separation of content and style follows in the footsteps of HTML/CSS and makes it easier to test and reason about each component separately from the others.
On-line key
The changes required to support inline style are minimal. Due to some renaming in version 4.0, the process will not be entirely mechanical, but it should be fairly straightforward:
BonMot 3
let chain = BONChain() .color(myColor) .font(myFont) .figureSpacing(.Tabular) .alignment(.Center) .string(text) label.attributedText = chain.attributedString
GoodWord 4
label.attributedText = text.styled( with : .color(myColor), .font(myFont), .numberSpacing(.monospaced), // renamed 4.0 .alignment(.center) )
Advantageous versions
In BonMot 3, you could save BONChains for later use. The same can be done with StringStyle in BonMot 4, with one major difference: while BONChain can contain a string, StringStyle cannot. It is applied to the string, resulting in an NSAttributedString :
BonMot 3
struct constants { static let myChain = BONChain() .color(myColor) .font(myFont) .tagStyles([ bold : myBoldChain, ]) } // and then later : let attrString = myChain.string(some string).attributedString
GoodWord 4
struct constants { static let myStyle = StringStyle( .color(myColor), .font(myFont), .xmlRules([ .style(bold, myBoldStyle), ]) } // and then later : let attrString = some string.styled(with : Constants.myStyle)
CocoaPods
BonMot is available through CocoaPods. To install , simply add the following line to your podfile: Pod BonMot
Carthago
BonMot is also compatible with Carthago. To install it, just add the following line to your cart file: github Right point/BonMot
GitHub
https://github.com/Rightpoint/BonMotThis post is about using attributes to make your code more readable. In this post, I’ll show you how to use attributes to make your code more readable.


